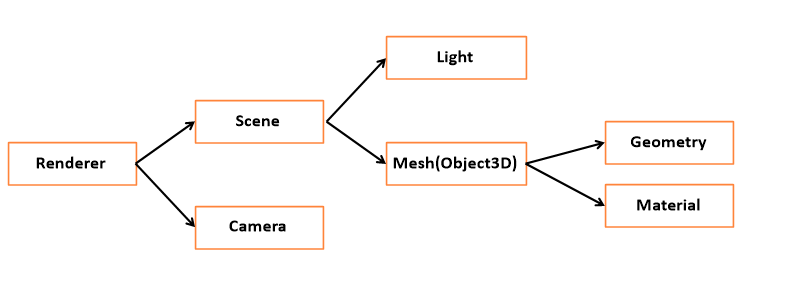
Three.js 에서 가장 기본이 되는 것은 Renderer, Scene, Camera이다.
이 개념을 먼저 익히고 라이브러리의 도식화에 대해서 파악한다.
Three.js의 기본개념은, Scene을 만들어 그 안에 3D 객체를 넣고, 그걸 Camera로 비추는 것 그리고 그 전체를 Renderer를 통해 HTML Canvas안에 Rendering하여 보여주는 것이다.
Three.js 앱의 구조부터 간략히 살펴보면 다음과 같다. Three.js 앱을 만들려면 다양한 객체를 생성해 연결해야 합니다. 아래는 Three.js 앱의 구조를 도식화한 것입니다.

아래는 자주 쓰는 것들을 단순하게 도식화 한 것입니다.

Renderer
Scene과 Camera객체를 넘겨 받아 카메라의 절두체 안의 3D Scene의 일부를 2차원 평면 이미지로 렌더링한다.
Scene
Scene은 광원인 Light와 Mesh로 구성된다.
Scene graph는 Scene 또는 다수의 Mesh, Light, Group, Object3D, Camera로 이루어진 트리구조이다.
Scene은 Graph의 최상위 노드로 Backgroun color, fog등의 요소를 포함한다.
Camera
도식화 그림에서 Camera는 반쯤 나가 있는데, Scene 그래프에 포함되지 않는다.
Light
여러 종류의 광원이다. 다양한 객체가 있다.
Mesh(Object3D)
Mesh는 형상을 정의하는 Geometry와 색상과 투명도를 정의하는 Material로 정의된다.
Material과 Gemoetry는 재사용이 가능해 여러개의 Mesh가 하나의 Material과 Gemoetry를 동시 참조가 가능하다.
Geometry
구, 정육면체 면, 등등 다양한 것이 될 수 있으며 내장 객체를 통해 만들수도 있고, 파일을 통해 가져와 형상을 만들 수 있다.
Material
표면 속성이라고 보면 된다. 색상, 투명도, 질감등을 사용한다.
그러면 기본적인 예를 통해서 Three.js의 기본 개념에 대해서 살펴보겠다.
예시는 GIS developer님의 유튜브 강좌를 참고하였다.
html
<!DOCTYPE html>
<html>
<head>
    <meta charset='utf-8'>
    <meta http-equiv='X-UA-Compatible' content='IE=edge'>
    <title>Page Title</title>
    <meta name='viewport' content='width=device-width, initial-scale=1'>
    <link rel='stylesheet' type='text/css' media='screen' href='01-basic.css'>
    <script src='01-basic.js' type="module" defer></script>
</head>
<body>
    <!--3차원 그래픽 캔버스 요소가 추가될 예정.-->
    <div id="webgl-container">
    </div>
</body>
</html>
css
* {
    outline: none;
    margin: 0;
}

body {
    overflow: hidden;
}

#webgl-container {
    position: absolute;
    top: 0;
    left: 0;
    width: 100%;
    height: 100%;
}
js
import * as THREE from '/node_modules/three/build/three.module.js'

console.log(THREE);

/*

 '_' 로 시작하는 Method와 Field는 Private 이라고 보면됨.
 JS는 private 성격을 부여할 수 있는 기능이 없어, _로 약속을 정의함.

*/
class App{
    constructor(){

        const divContainer = document.querySelector("#webgl-container");
        this._divContainer = divContainer;  //다른 메서드에서 참조 할 수 있도록 함.

        // [STEP 1] Renderer 세팅
        const renderer = new THREE.WebGLRenderer({
            // 생성할때 다양한 옵션을 설정할 수 있음.
            antialias : true        // antialias : true => 경계선의 계단현상을 없애줌
        });
        // renderer의 PixelRatio값을 device값을 받아 세팅
        renderer.setPixelRatio(window.devicePiexelRatio);

        // div컨테이너의 자식에 추가
        divContainer.appendChild(renderer.domElement);  //canvas타입의 DOM 객체

        this._renderer = renderer; // renderer를 다른 메서드에서 참조 할 수 있도록 정의

        // [STEP 2] Scene 객체 생성
        const scene = new THREE.Scene();
        this._scene = scene;    // scene을 다른 메서드에서 참조 할 수 있도록 정의

        // [STEP 3] Camera 객체 생성
        this._setupCamera();

        // [STEP 4] Ligth 객체 생성
        this._setupLight();

        // [STEP 5] 3차원 모델 객체 생성
        this._setupModel();

        //[STEP 6] resize check

        // 창크기가 변경할때 발생하는 이벤트
        // -> Renderer와 Camera는 창이 변할때 설정값을 재설정 해줘야 하기 때문에 필요함.
        // bind를 사용하는 이유 : this가 App객체 되기 위함.
        window.onresize = this.resize.bind(this);
        this.resize();  //생성자에서 무조건 실행함으로써 재설정.

        // render 메서드는 3차원 그래픽 을 만들어주는 메서드
        // 최대한 빠르게 render메서드를 호출해줌.
        requestAnimationFrame(this.render.bind(this));
    }

    _setupCamera(){
        // 크기를 얻어옴.
        const width = this._divContainer.clientWidth;
        const height = this._divContainer.clientHeight;

        const camera = new THREE.PerspectiveCamera(
            75,
            width / height,
            0.1,
            100
        );

        camera.position.z = 2;
        this._camera = camera;
    }

    _setupLight(){
        //광원의 색상, 광원의 세기값이 필요함
        const color = 0xffffff; //색상
        const intensity = 1    //세기값

        const light = new THREE.DirectionalLight(color, intensity);

        //광원의 위치
        light.position.set(-1, 2, 4);

        //scene에 구성요소로 Light를 넣어줌.
        this._scene.add(light);
    }

    _setupModel(){
        // 정육면체를 생성하는 코드.
        // Mesh 엔 Geometry, Material
        const geometry = new THREE.BoxGeometry(1,1,1);  //가로 세로 깊이
        const material = new THREE.MeshPhongMaterial({
            color : 0x44a88 // 파란색
        });

        // Mesh가 생성
        const cube = new THREE.Mesh(geometry, material);

        // Scene에 담음.
        this._scene.add(cube);
        this._cube = cube;
    }

    //창크기가 변경될때 발생하는 메서드
    resize(){
        // divContainer의 크기를 얻어옴.
        const width = this._divContainer.clientWidth;
        const height = this._divContainer.clientHeight;

        // 카메라의 속성값을 설정해줌
        this._camera.aspect = width / height;
        this._camera.updateProjectionMatrix();

        // 렌더러를 속성값을 설정
        this._renderer.setSize(width, height);
    }

    // 장면의 Animation에 이용
    render(time){
        // 렌더링 하라
        this._renderer.render(this._scene, this._camera);

        // update메서드 안에서 속성값을 변경하여 애니메이션 효과를 발생시킴.
        this.update(time);

        // 생성자에서 호출했던 코드와 동일
        requestAnimationFrame(this.render.bind(this));
    }

    update(time){
        time *= 0.001; // second 단위로 변경
        this._cube.rotation.x = time; // x축 변경
        this._cube.rotation.y = time; // y축 변경
    }
}

window.onload = function(){
    new App();
};
js코드는 class 키워드를 사용하여 객체지향 방식으로 예제 코드를 작성 되어 있습니다.
앞서 도식화된 구조가 코드에서 잘보여집니다.
Renderer에는 Scene과 Camera가 들어가고
Scene에 Light와 Mesh가 들어가고,
this._scene.add(cube);
Mesh에는 Geometry와 Material이 들어가고

Ref
three.js manual
threejs.org
GIS DEVELOPER
안녕하세요, GIS Developer 김형준입니다. 지리정보시스템(GIS) 분야에서 활동하고 있는 소프트웨어 개발자입니다. GIS는 현실 세계의 공간 데이터에 기반한 데이터 처리와 분석 그리고 시각화를 위
www.youtube.com
'Frontend > Three.js' 카테고리의 다른 글
| [Three.js] 3차원 공간구성 (scene graph) (0) | 2022.07.17 |
|---|---|
| [Three.js] .gltf 파일 로딩하기 (0) | 2022.07.15 |
| [Three.js] Geometry - 다양한 Geometry 객체 (0) | 2022.07.14 |
| [Three.js] Geometry - BoxGeometry와 WireFrameGeometry (0) | 2022.07.13 |
| [Three.js] 개발환경구성 해보기 (0) | 2022.06.22 |


