이번에는 Three.js의 구조를 익힌것을 바탕으로 하여, 공간구성을 해보겠다.
앞서 공부했던, Geometry(3차원 객체의 형상) 는 Material(3차원 객체의 색상, 투명도)과 함께 Mesh(3차원 객체를 표시하기 위한 객체)를 구성한다.
Object 3D를 하위 클래스는 Mesh, Line, Points 세가지가 있다. 이 객체들은 3차원 공간상에 놓여지게 된다.
3차원 공간에 놓여지기 위해서는 "위치, 회전, 크기" 값이 필요하다.
따라서 Object 3D는 poistion, rotation, scale이라는 속성을 갖는다. 아래 코드는 Object3D의 기본 생성자 코드이다.
추가적으로 Quaternion도 있는게 보이는데, 이 부분은 추후에 알아보겠다.
* 3D 객체는 2배의 크기로 표시가 된다.
class Object3D extends EventDispatcher {

	constructor() {
        //...
                const position = new Vector3();
		const rotation = new Euler();
		const quaternion = new Quaternion();
		const scale = new Vector3( 1, 1, 1 );

        //..
    }
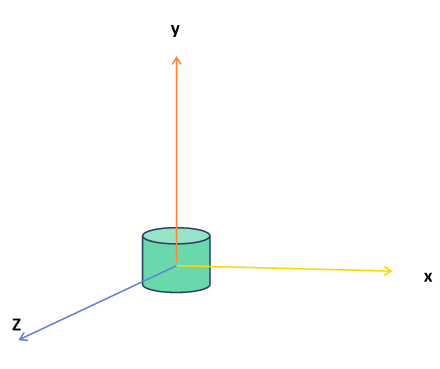
위치에 대해서 보자면, 모니터를 기준으로 봤을때 아래와 같다. \
x : 오른쪽이 +x, 왼쪽이 -x
y : 위가 +y, 아래가 -y
z : 나의쪽으로 +z, 뒤쪽으로 멀리.. -z 라고 생각하면된다.

이 개념을 바탕으로 하여, 우주 공간을 만드는 예제 코드를 활용하여 학습하여 보겠다.
3차원 공간구성에서 장면구성을, scene graph 라고한다.
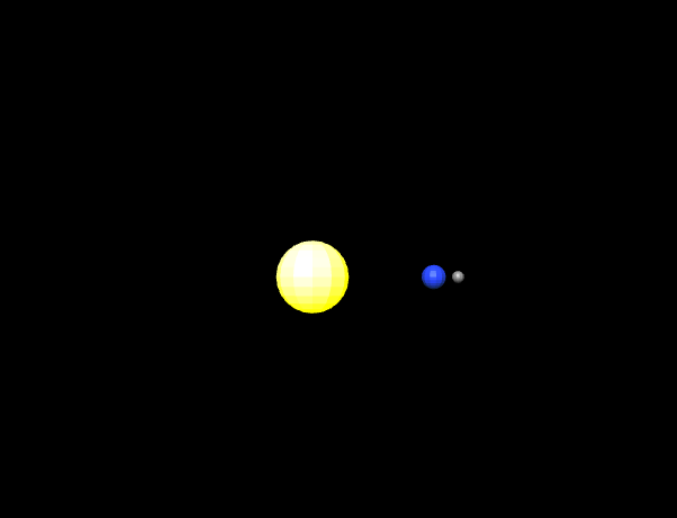
태양, 지구, 달을 아래와 같이 정의하였다. solarSystem은 sunMesh와 earthOrbit을 자식으로 두고 있다.
solarSystem (Object3D)
- sunMesh(Mesh)
- earthOrbit(Object3D) - earthMesh(Mesh)
- moonOrbit(Object3D) - moonMesh(Mesh)
아래는 sceneGraph를 참고하여 , model을 구성한 javscript 코드이다.
import * as THREE from 'three'
import {OrbitControls} from 'OrbitControls'
import { CameraHelper, Texture } from 'three';

class App{
    constructor(){
        const divContainer = document.querySelector("#webgl-container");
        this._divContainer = divContainer;  //다른 메서드에서 참조 할 수 있도록 함.

        // [STEP 1] Renderer 세팅
        const renderer = new THREE.WebGLRenderer({
            antialias : true
        });
        renderer.setPixelRatio(window.devicePiexelRatio);
        divContainer.appendChild(renderer.domElement);  //canvas타입의 DOM 객체

        this._renderer = renderer; // renderer를 다른 메서드에서 참조 할 수 있도록 정의

        // [STEP 2] Scene 객체 생성
        const scene = new THREE.Scene();
        this._scene = scene;

        this._setupCamera();
        this._setupLight();
        this._setupModel();
        this._setupControls();

        window.onresize = this.resize.bind(this);
        this.resize();
        requestAnimationFrame(this.render.bind(this));
    }

    _setupCamera(){
        const width = this._divContainer.clientWidth;
        const height = this._divContainer.clientHeight;

        const camera = new THREE.PerspectiveCamera(
            75,
            width / height,
            0.1,
            100
        );
        camera.position.set(0,0,50);
        this._camera = camera;
    }

    _setupLight(){
        const color = 0xffffff;
        const intensity = 1
        const light = new THREE.DirectionalLight(color, intensity);
        light.position.set(-1, 2, 4);
        this._scene.add(light);
    }

    _setupControls(){
        new OrbitControls(this._camera, this._divContainer);
    }

    _setupModel(){

        /*
        ### SceneGraph
        solarSystem (Object3D)
                                - sunMesh(Mesh)
                                - earthOrbit(Object3D)   -  earthMesh(Mesh)
                                                         -  moonOrbit(Object3D)   - moonMesh(Mesh)

        */

        //1. solarSystem (Object3D)
        const solarSystem = new THREE.Object3D();
        this._scene.add(solarSystem);

        //2-1. sunMesh(Mesh) - geometry (계속사용할 구 geometry)
        const radius= 1;
        const widthSegements = 12;
        const heightSegements = 12;
        const sphereGeometry = new THREE.SphereGeometry(radius,widthSegements,heightSegements);

        //2-2. sunMesh(Mesh) - material
        const sunMaterial = new THREE.MeshPhongMaterial({emissive: 0xFFFF00, flatShading : true});

        //2-3. sunMesh
        const sunMesh = new THREE.Mesh(sphereGeometry, sunMaterial);
        sunMesh.scale.set(3,3,3);
        solarSystem.add(sunMesh);

        //3. earhOrbit
        const earthOrbit = new THREE.Object3D();
        solarSystem.add(earthOrbit);

        //3-1. earthMesh
        const earthMaterial = new THREE.MeshPhongMaterial({
            color : 0x2233ff, emissive :0x112244 , flatShading : true
        });
        const earthMesh = new THREE.Mesh(sphereGeometry, earthMaterial);
        earthOrbit.position.x =10;  //10만큼 떨어지게 배치함.
        earthOrbit.add(earthMesh);

        //3-2 moonOrbit
        const moonOrbit = new THREE.Object3D();
        moonOrbit.position.x =2;
        earthOrbit.add(moonOrbit);
        const moonMaterial = new THREE.MeshPhongMaterial({
            color:0x888888, emissive :0x222222, flatShading:true
        });
        const moonMesh = new THREE.Mesh(sphereGeometry, moonMaterial);
        moonMesh.scale.set(0.5,0.5,0.5);
        moonOrbit.add(moonMesh);
    }

    resize(){
        const width = this._divContainer.clientWidth;
        const height = this._divContainer.clientHeight;
        this._camera.aspect = width / height;
        this._camera.updateProjectionMatrix();
        this._renderer.setSize(width, height);
    }

    render(time){
        this._renderer.render(this._scene, this._camera);

        this.update(time);

        requestAnimationFrame(this.render.bind(this));
    }

    update(time){
        time *= 0.001;
    }
}

window.onload = function(){
    new App();
};
setModel() 함수를 중점적으로 보자면,
_setupModel(){

        /*
        ### SceneGraph
        solarSystem (Object3D)
                                - sunMesh(Mesh)
                                - earthOrbit(Object3D)   -  earthMesh(Mesh)
                                                         -  moonOrbit(Object3D)   - moonMesh(Mesh)

        */

        //1. solarSystem (Object3D)
        const solarSystem = new THREE.Object3D();
        this._scene.add(solarSystem);

        //2-1. sunMesh(Mesh) - geometry (계속사용할 구 geometry)
        const radius= 1;
        const widthSegements = 12;
        const heightSegements = 12;
        const sphereGeometry = new THREE.SphereGeometry(radius,widthSegements,heightSegements);

        //2-2. sunMesh(Mesh) - material
        const sunMaterial = new THREE.MeshPhongMaterial({emissive: 0xFFFF00, flatShading : true});

        //2-3. sunMesh
        const sunMesh = new THREE.Mesh(sphereGeometry, sunMaterial);
        sunMesh.scale.set(3,3,3);
        solarSystem.add(sunMesh);

        //3. earhOrbit
        const earthOrbit = new THREE.Object3D();
        solarSystem.add(earthOrbit);

        //3-1. earthMesh
        const earthMaterial = new THREE.MeshPhongMaterial({
            color : 0x2233ff, emissive :0x112244 , flatShading : true
        });
        const earthMesh = new THREE.Mesh(sphereGeometry, earthMaterial);
        earthOrbit.position.x =10;  //10만큼 떨어지게 배치함.
        earthOrbit.add(earthMesh);

        //3-2 moonOrbit
        const moonOrbit = new THREE.Object3D();
        moonOrbit.position.x =2;
        earthOrbit.add(moonOrbit);
        const moonMaterial = new THREE.MeshPhongMaterial({
            color:0x888888, emissive :0x222222, flatShading:true
        });
        const moonMesh = new THREE.Mesh(sphereGeometry, moonMaterial);
        moonMesh.scale.set(0.5,0.5,0.5);
        moonOrbit.add(moonMesh);
    }
다음과 같다. Three.js를 사용하다보면 다 객체의 부모자식관계가 있는 것을 알 수 있는데 SceneGraph를 활용할때 그 부분을 느낄 수 있다.
solarSystem인 Obejct3D 객체를 만들어 scene에 추가하고
solarSystem에 sunMesh와 earthOrbit을 추가하고
sunMesh에는 구를 만드는 geometry인 sphereGeometry와 Material을 넣어준다.
earthOrbit에는 earthMaterial과 sphereGeometry가 추가된 earthMesh와 moonOribt을 추가한다.
moonOrbit에는 moonMaterial와 sphereGeometry가 추가된 moonMesh가 추가된다.
이런식으로 하나하나 객체를 만들어 추가해주는 방식으로 진행되는 것을 알 수 있다.
응용만 잘한다면 원하는대로 어떤 것이든지 만들 수 있을 것같다.

이 객체들을 공전, 자전을 하는 모습으로 아래와 같이 코드를 추가해 보겠다.
    _setupModel(){
		//...

        //다른 곳에서 사용할 수 있도록
        this._solarSystem = solarSystem;
        this._earthOrbit = earthOrbit;
        this._moonOrbit = moonOrbit;
    }

     update(time){
        time *= 0.001;
        this._solarSystem.rotation.y = time / 2;
        this._earthOrbit.rotation.y  = time * 2;
        this._moonOrbit.rotation.y = time * 5;
    }
update함수를 사용하여 공전, 자전이 되는 것 처럼 보이게 구현한다.
앞선 포스팅에서 배운것을 바탕으로 rotation을 사용하여 구현하였다.
다음은 실행결과다.

GitHub - jaero0725/ThreeJsStudy: 📹 Three.js - JavaScript 3D Library
📹 Three.js - JavaScript 3D Library. Contribute to jaero0725/ThreeJsStudy development by creating an account on GitHub.
github.com
[Three.js] Three.js 기본개념
Three.js 에서 가장 기본이 되는 것은 Renderer, Scene, Camera이다. 이 개념을 먼저 익히고 라이브러리의 도식화에 대해서 파악한다. Three.js의 기본개념은, Scene을 만들어 그 안에 3D 객체를 넣고, 그걸 Ca
zeroco.tistory.com
'Frontend > Three.js' 카테고리의 다른 글
| [Three.js] Material 종류 (0) | 2022.07.18 |
|---|---|
| [Three.js] .gltf 파일 로딩하기 (0) | 2022.07.15 |
| [Three.js] Geometry - 다양한 Geometry 객체 (0) | 2022.07.14 |
| [Three.js] Geometry - BoxGeometry와 WireFrameGeometry (0) | 2022.07.13 |
| [Three.js] Three.js 기본개념 (0) | 2022.07.12 |


